Showing all 8 results
PCPartPicker part list / Price breakdown by merchant
| Type | Item | Price |
|---|---|---|
| CPU | AMD – Ryzen 5 2600 3.4 GHz 6-Core Processor | $145.00 @ Amazon |
| Motherboard | *ASRock – B450 Pro4 ATX AM4 Motherboard | $59.99 @ Newegg |
| Memory | *Patriot – Viper 4 8 GB (2 x 4 GB) DDR4-3000 Memory | $69.89 @ OutletPC |
| Storage | *Team – L5 LITE 480 GB 2.5″ Solid State Drive | $52.89 @ OutletPC |
| Video Card | *Gigabyte – Radeon RX 570 4 GB Gaming 4G Video Card | $129.99 @ Newegg |
| Case | *Corsair – SPEC-01 RED ATX Mid Tower Case | $24.99 @ Newegg |
| Power Supply | *Corsair – CXM 550 W 80+ Bronze Certified Semi-Modular ATX Power Supply | $29.99 @ Newegg |
| Operating System | Microsoft – Windows 10 Home OEM 64-bit | $98.89 @ OutletPC |
| Prices include shipping, taxes, rebates, and discounts | ||
| Total (before mail-in rebates) | $696.63 | |
| Mail-in rebates | -$85.00 | |
| Total | $611.63 | |
| *Lowest price parts chosen from parametric criteria | ||
| Generated by PCPartPicker 2018-11-22 19:09 EST-0500 |

If you are attempting to configure a D-Link router, take note of your computer’s Default Gateway IP address. The Default Gateway is the IP address of the D-Link router. By default, it should be 192.168.0.1. Most D-Link devices use the 192.168.0.X range. [D-Link Support]
Need help finding your Default Gateway address?
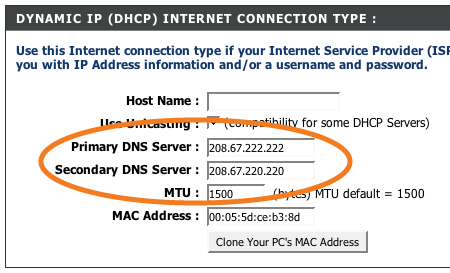
Please write down your current DNS settings before switching to OpenDNS, in case you want to return to your old settings for any reason.
The addresses for OpenDNS are:
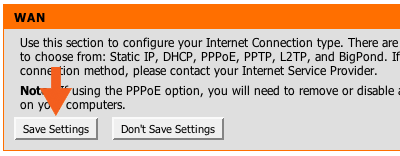
Note: To enable these configurable DNS fields, you may need to disable the ‘Enable Advanced DNS’ feature, found in the same configuration page.
When you use Google Public DNS, you are changing your DNS “switchboard” operator from your ISP to Google Public DNS.
In most cases, the IP addresses used by your ISP’s domain name servers are automatically set by your ISP via the Dynamic Host Configuration Protocol (DHCP). To use Google Public DNS, you need to explicitly change the DNS settings in your operating system or device to use the Google Public DNS IP addresses. The procedure for changing your DNS settings varies according to operating system and version (Windows, Mac or Linux) or the device (computer, phone, or router). We give general procedures here that might not apply for your OS or device; please consult your vendor documentation for authoritative information.
Before you change your DNS settings to use Google Public DNS, be sure to write down the current server addresses or settings on a piece of paper. It is very important that you keep these numbers for backup purposes, in case you need to revert to them at any time.
We also recommend that you print this page, in the event that you encounter a problem and need to refer to these instructions.
The Google Public DNS IP addresses (IPv4) are as follows:
The Google Public DNS IPv6 addresses are as follows:
You can use either address as your primary or secondary DNS server. You can specify both addresses, but do not specify the same address as both primary and secondary.
You can configure Google Public DNS addresses for either IPv4 or IPv6 connections, or both. For IPv6-only networks with a NAT64 gateway using the 64:ff9b::/96 prefix, you can use Google Public DNS64 instead of Google Public DNS IPv6 addresses, providing connectivity to IPv4-only services without any other configuration.
Some devices use separate fields for all eight parts of IPv6 addresses and cannot accept the :: IPv6 abbreviation syntax. For such fields enter:
Expand the 0 entries to 0000 if four hex digits are required.
Because the instructions differ between different versions/releases of each operating system, we only give one version as an example. If you need specific instructions for your operating system/version, please consult your vendor’s documentation. You may also find answers on our user group.
Many systems allow you to specify multiple DNS servers, to be contacted in a priority order. In the following instructions, we provide steps to specify only the Google Public DNS servers as the primary and secondary servers, to ensure that your setup will correctly use Google Public DNS in all cases.
DNS settings are specified in the TCP/IP Properties window for the selected network connection.
Example: Changing DNS server settings on Windows 7
If you are prompted for an administrator password or confirmation, type the password or provide confirmation.
DNS settings are specified in the Network window.
Example: Changing DNS server settings on Mac OS 10.5
In most modern Linux distributions, DNS settings are configured through Network Manager.
Example: Changing DNS server settings on Ubuntu
eth0.If your distribution doesn’t use Network Manager, your DNS settings are specified in /etc/resolv.conf.
Example: Changing DNS server settings on a Debian server
/etc/resolv.conf:
sudo vi /etc/resolv.conf
nameserver lines appear, write down the IP addresses for future reference.nameserver lines with, or add, the following lines:
For IPv4:
nameserver 8.8.8.8
nameserver 8.8.4.4
For IPv6:
nameserver 2001:4860:4860::8888
nameserver 2001:4860:4860::8844
For IPv6-only, you can use Google Public DNS64 instead of the above IPv6 addresses.
Additionally, if you are using DHCP client software that overwrites the settings in /etc/resolv.conf, you will need to set up the client accordingly by editing the client’s configuration file.
Example: Configuring DHCP client sofware on a Debian server
/etc/resolv.conf:
sudo cp /etc/resolv.conf /etc/resolv.conf.auto
/etc/dhcp3/dhclient.conf:
sudo vi /etc/dhcp3/dhclient.conf
domain-name-servers, write down the IP addresses for future reference.For IPv4:
prepend domain-name-servers 8.8.8.8, 8.8.4.4;
For IPv6:
prepend domain-name-servers 2001:4860:4860::8888, 2001:4860:4860::8844;
For IPv6-only, you can use Google Public DNS64 instead of the above IPv6 addresses.
Every router uses a different user interface for configuring DNS server settings; we provide only a generic procedure below. For more information, please consult your router documentation.
To change your settings on a router:
Some routers use separate fields for all eight parts of IPv6 addresses and cannot accept the :: IPv6 abbreviation syntax. For such fields enter:
Expand the 0 entries to 0000 if four hex digits are required.
DNS servers are typically specified under advanced Wi-Fi settings. However, as every mobile device uses a different user interface for configuring DNS server settings, we provide only a generic procedure below. For more information, please consult your mobile provider’s documentation.
To change your settings on a mobile device:
To test that the Google DNS resolver is working:
http://www.google.com/). If it resolves correctly, bookmark the page, and try accessing the page from the bookmark.
http://ipv4.google.com/).If all of these tests work, everything is working correctly. If not, go to step 2.
http://216.218.228.119/ (which points to the test-ipv6.com website) as the URL.1
http://[64:ff9b::d8da:e477]/ as the URL instead. If this test does not work, you do not have access to a NAT64 gateway at the reserved prefix 64:ff9b::/96 and cannot use Google Public DNS64.http://[2001:470:1:18::119]/ as the URL instead.If this works correctly, bookmark the page, and try accessing the page from the bookmark. If these tests work (but step 1 fails), then there is a problem with your DNS configuration; check the steps above to make sure you have configured everything correctly. If these tests do not work, go to step 3.
If you encounter any problems after setting Google Public DNS as your resolver, please run the diagnostic procedure.
1 Google thanks Jason Fesler for granting permission to use test-ipv6.com URLs for browser DNS testing purposes.
If you had not previously configured any customized DNS servers, to switch back to your old settings, in the window in which you specified the Google IP addresses, select the option to enable obtaining DNS server addresses automatically, and/or delete the Google IP addresses. This will revert your settings to using your ISP’s default servers.
If you need to manually specify any addresses, use the procedures above to specify the old IP addresses.
If necessary, restart your system.
Shepard Smith of Fox News discusses the online privacy law that is being repealed and how to protect your online privacy.
This tutorial explains how to download and install the NordVPN application to your Windows PC, Log in, and connect to our servers. You can also find an explanation of various settings.
1. Open the NordVPN downloads page here: https://nordvpn.com/download/
Click on Download Now next to the Windows Section.
2. Navigate to your Downloads folder and double-click the latest.exe installation file you have downloaded.
3. A new window might pop up (depending on your Windows settings) asking “Do you want to allow this app to make changes to your device?”. Click Yes.
4. If installing for the first time, the OpenVPN TAP adapter installation will appear. In the window, click Next, I Agree, Next, and Install.
5. Then the installer window will open. Click Install in the first screen.
6. The installer will proceed with the installation process.
7. Once installed, the NordVPN application will start, and appear in a new window. A shortcut to the application will also appear on your desktop.
When connecting for the first time, Windows may ask if you wish to allow NordVPN to install a TAP driver. It is necessary for the NordVPN application to make a connection to the NordVPN servers – click Allow if such message appears.
8. In the NordVPN window, enter your NordVPN credentials and click Login now.
9. The main screen of the application will appear. Here you can see the menu at the top left corner, a big, round Quick Connect button and status identifier in the top middle, a search button in the top right corner, and the map of countries you can connect to.
10. Clicking the Quick Connect button at the top of the application will automatically connect you. Using a complex formula that includes various server parameters, Quick Connect chooses the best server for you at that moment.
11. Once connected, the country pin on the map will light up green, as well as the Quick Connect button sliding all the way to the right and the status label saying that you are connected. It will also tell you your new IP address.
12. You can also connect by clicking the country pin on the map itself,

As well as clicking the List button in the left side, and clicking the country in the list that appears.
13. If you stay in the Map view for a bit without connecting, the Connection wizard will appear.
14. The Connection wizard will give a recommendation for you, depending on your needs.
15. You can also search for servers in the search menu found at the top right corner of the application. Simply search for a specific server or category.
16. In the Servers tab, you can find each specific server that we offer, neatly organized into categories and countries.
17. For example, we can expand the Double VPN category, and select the Netherlands – UK Double VPN server.
You can notice that each server has a percentage next to it, which indicates the current load of the server. The more people connecting to the server, the higher the percentage.
The distance to the server is also visible. That way you can quickly see if the server is further away from you.
18. To connect to the specific server, click the Connect now button in the sidebar.
Once connected, the sidebar will display the current amount of traffic transmitted.
You can also note that the top of the app also indicates that you are connected by sliding the Quick Connect button to the right side, and also displaying an appropriate status.
19. You can also add a server to your favourites by clicking the heart symbol next to it in the list, or, if the server is currently selected, in the sidebar.
20. Your favourite servers will appear in their own category, called My Favourite Servers. You can connect to them like any other server.
21. In the Settings tab you can configure the application to your liking.
For example, you are using a public network, and use NordVPN to protect your confidential Skype conversation. You can add Skype to the Kill Switch list. In the case of an unexpected VPN connection cutoff, such as an unstable WiFi network, Windows will re-connect to WiFi, but the VPN connection will not be enabled yet. Kill Switch will close down Skype before it can transmit any of your sensitive info on the public network, thus ensuring your privacy.
In the sidebar on the left you can also access your account details and the system log. The Logout button is also at the bottom.
22. Once you close the application, it will still be running in the background. If Show Tray icon is enabled in the settings, you can see the application running in the system tray area, which can be found at the bottom right corner of your screen.

It might also be in the hidden system tray area, which can be opened with the upwards arrow.
23. You can click this system tray icon to bring the application to the foreground. You can also right-click the icon to either perform a Quick Connect, or terminate the application completely.
First, make sure you install Adblocker to your Chrome or Firefox
Click Here or copy and past this link in your browser: https://easylist.to/
Find the EasyPrivacy section towards the lower part of the page and click “add it to your ad blocker” as shown below.
 A tab will open with the Adblocker settings and will give you the option to add the new filter subscription. Click the Add button as shown below.
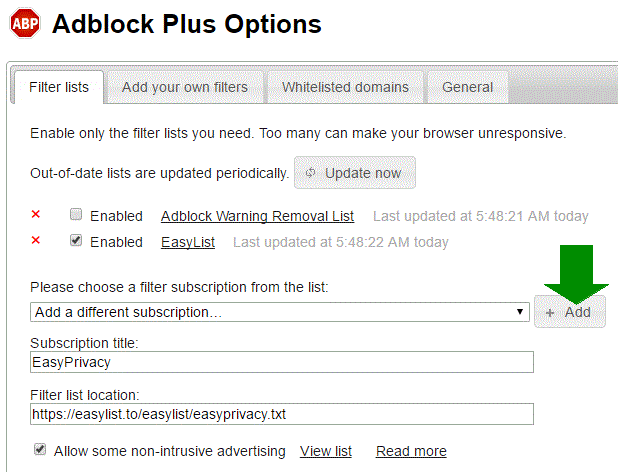
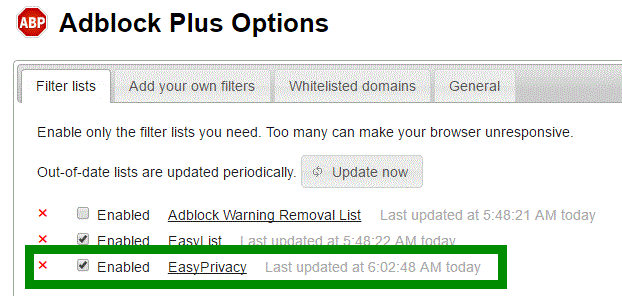
Once installed, you will see EasyPrivacy is Enabled and the filter is active.

Ok, I couldn’t resist. My apologies.
How about a free ebook with some jokes in it to make up for my funny bone:
Clean_Jokes_from_the_Internet_5.5×8.5_PDF
Hope you will forgive me!
We highly recommend that you use an antivirus with your system.
Using Local Group Policy Editor to disable Windows Defender from your computer permanently.
Computer Configuration > Administrative Templates > Windows Components > Windows Defender
 Loading...


